Wow, ok, hi guys. I’m still alive. Life got…interesting for a while. It continues to be fairly “interesting”, for that matter, and long-form blogging just sort of got to be a little too much for me to keep up with. I’ve been active recently on Instagram (come visit me! I’m themakeupklutz there!), where I can focus on pictures, visual comparisons, and the occasional snarky comment, but tonight as I was typing up a four-paragraph IG caption, it occurred to me: I have a blog! I can blog on the, you know, blog. Like a blogger. With a blog.
And thus, I blog!
Today’s adventure involves the dreaded foundation matching. This has been giving me trouble for ages, and I’ve got almost an entire drawer’s worth of failed attempts to match myself. See, as best I’ve been able to tell, I have two problems that make me hard to match. First, I am pale. Super-pale. Uber-pale. Pale as fuck, one might even say. Second, my undertone is “what’s an undertone?” Which is to say, my skin is neutral; neither cool nor warm tones match quite right on me. But every company’s idea of “neutral” – if they bother to have one at all – seems to vary and, well, ugh.
So yeah. Much foundation has been purchased. Many teeth have been gnashed. Finally today, after trying yet another foundation from my drawer that didn’t seem quite right, I decided I was going to do something about it. I was going to march my little butt into a MAC store, throw myself on their mercy, and leave there triumphantly matched to The Foundation Shade.
Except…it didn’t quite work like that. The makeup artist who helped me was a little perplexed by my request, since she thought I’d walked in wearing a foundation that matched me perfectly and wasn’t quite sure why I was insisting it didn’t. Nevertheless, she agreed both that I am super-pale and that I’m aggressively neutral, and matched me (taking into account my “I’ve tried NC15 before and it just seemed so pale!”) to MAC Mineralize in NC20. I took some pictures, squinted in the mirror, and just couldn’t quite bring myself to pull the trigger. So the very understanding MUA sent me home with a sample.
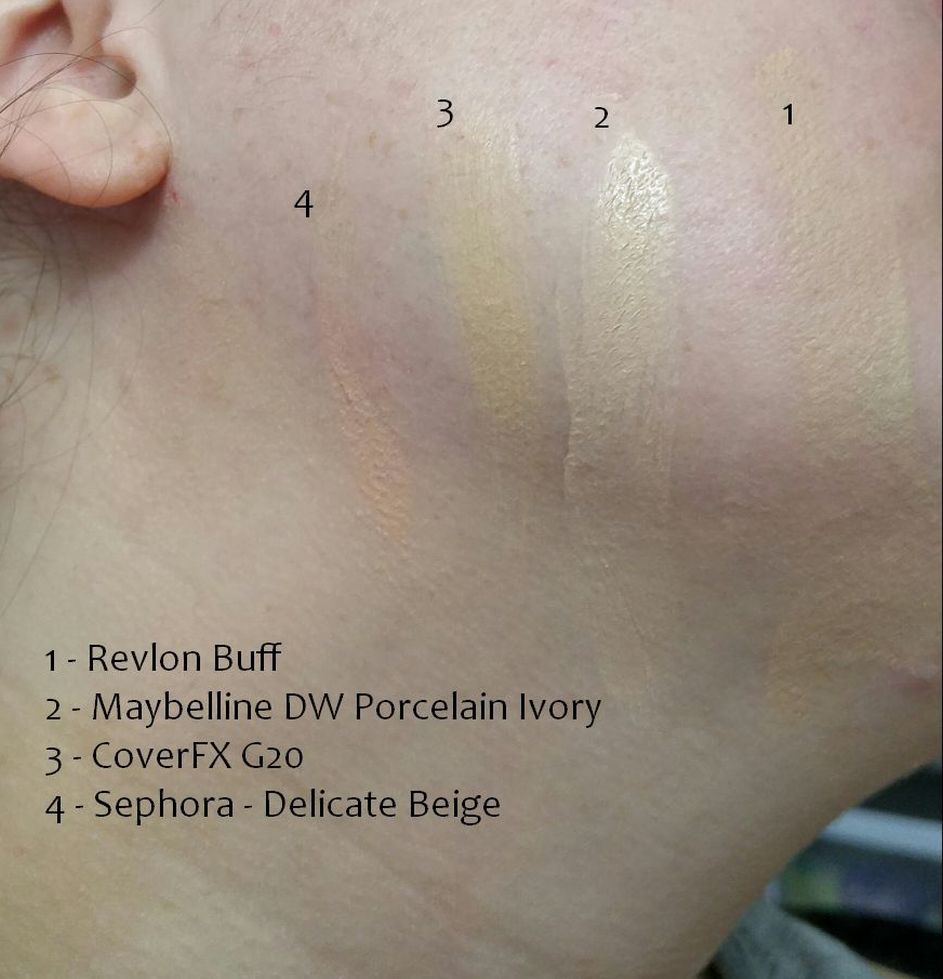
When I got home, I decided, “You know what? I have all these foundations, and all this skin. Why not just…put them all on my face and see what matches best. I can do it overlapping jaw and neck, even, since they’re different colors!” So I did.
Revlon Whipped Creme Foundation in 150 Buff, Maybelline Dream Wonder Fluid Touch Foundation in Porcelain Ivory, CoverFX Total Cover Cream Foundation in G20, Sephora 10-hour Wear Perfection Foundation in Delicate Beige
And then I did some more.
MAC Mineralize NC20, Maybeline Dream Smooth Mousse Porcelain Ivory, Maybelline Dream Smooth Mousse Classic Ivory, Tarte Amazonian Clay Full Coverage Airbrush Foundation Fair-Light Neutral
Yeah, I’m still not warm-toned. Or cool toned. Or really anything other than “pale as fuck”. It turns out the MAC MUA wasn’t kidding: Porcelain Ivory is by far my best match out of my current stash. Now, I’ve been wearing the Tarte, the Revlon, and the Sephora foundations pretty regularly for the last few months, and all have been passable matches to my face but have looked weird next to my neck. The trouble is, the whole reason I hauled myself into MAC today is that the exact same thing happened with Maybelline’s Porcelain Ivory. So it seems like no matter what I put on, my neck is going to look weird?
Here’s shots of most of the main contenders on me over the past few months. My lighting isn’t consistent, but this at least compares each to my neck.
Revlon Whipped Cream Foundation – 150 Buff (look details)Sephora 10-Hour Wear Foundation Delicate Beige (look details)CoverFX Total Cover Cream Foundation G20 (look details)Also CoverFX G20, wtf lighting (look details)Maybelline Dream Smooth Mousse Foundation Porcelain Ivory (look details)
So yeah. I am a mutant maybe? My neck is a chameleon? My neck just hates me and will never match anything?
Should I keep wearing the ones that seem like OK matches? Should I go to Sephora/CVS/Rite Aid and just buy the palest shade every brand makes? I know NARS Siberia is popular amongst other super-pale MUAs.
Time for another round-up! I bought my first roll of striping tape recently, so the past couple manicures have been all about getting the hang of the stuff. I have to say, I like it! It’s not going to keep me from getting polish everywhere, but it definitely makes art easier.
Let’s start with purple. Purple polishes make up one of the largest portions of my collection because, well, I like purple. It’s fun. I decided to use my striping tape to attempt a french manicure. This was the result:
Purple french manicure – Avon Gel Finish in Lavender Sky (light), ELF polish in Violet Velvet
Yeah, so like I said, striping tape isn’t a panacea. It made my lines neater than they otherwise would have been, but that can only go so far when the fact is that I just don’t have steady hands. I also had some problems with Lavender Sky, which is from Avon’s Gel Finish line of polishes. I do like this line – in fact, I own every color they make it in because I like it so much – but this polish, on this day, was just misbehaving. Somehow it managed to be both watery and gloopy; it’s a thin polish, but it begins drying so fast that it can out-dry itself. I ended up with a weird bubble on one thumbnail where the outside of the polish had started drying before the rest of it had had a chance to self-level. On other fingers, when I pulled the tape up moments after applying it to my tips, it had already started to get stringy.
Ah, well. Ignoring the technique bobbles, I still like the effect.
Next, it was time for another trollicure (wondering what I mean by that? See here. Short version: my husband dislikes certain colors because sports. So of course I wear those colors!). This time, the colors I was aiming for were black and gold. Now, I do own a black creme, but it’s not a great formula, and it ends up looking gray and patchy. So I decided to use another polish from the Avon Gel Finish line as a stand-in. Inked Up is a deep, dark blue – so dark that on my swatch sticks, it was pretty much indistinguishable from black. On my fingers, it turned out to register more clearly as dark navy, but I don’t care because it looked so awesome.
Avon Gel Finish – Inked Up (dark), Avon Gel Finish – Glimmer (gold)
This is another striping tape manicure; I laid down one coat of Glimmer, a gold also from the Gel Finish line, let that dry for half an hour, and then placed a strip of striping tape at about french-tip level. Then I covered it with a single coat (yes, a single coat! OCW!) of Inked Up and pulled off the tape. If you look closely, you can see that it’s still not perfect – there are spots where the blue bled into the gold, and vice versa – but it came out neater than the previous manicure. My husband and I both loved this look, he in spite of himself, and I was sad to take it off. So elegant! So simple! I think next time I need a manicure for a wedding or job interview, I might try this one again.
Before I get into the next manicure, a bit of backstory: My husband was traveling this week, and I have a dangerous habit of comforting myself when he’s away by buying makeup. I went into Rite-Aid one day to buy some decongestant and walked out with…all this (hey, and the decongestant!). In my defense, Wet ‘n’ Wild was 40% off, Revlon was BOGO50%, and there were a bunch of new-to-me displays of inexpensive polishes out (satin finish Jesse’s Girl? Yes please!). What else was I supposed to do but buy it all?
The results of going into Rite-Aid during a moment of weakness
As I was swatching the new polishes later that day, I realized that I now have a pretty wide selection of full-coverage, textured glitters, especially in shades of purple. I toyed with the idea of a skittles manicure of purple, blue, gold, and green glitters, but then decided that might be a little too out-there, given that it’s not Mardi Gras. So I settled on a purple ombre effect, instead.
A variety of textured purple glitters (no flash). Starting from pinky: Avon Brushed Metals in Dusty Copper, L’Oreal Gold Dust in Sexy in Sequins, Julie G in Sugar Plum Fairy, L’Oreal Gold Dust in Too Dimensional?, and Avon Brushed Metals in Lilac Quartz
Brushed Copper didn’t quite fit into the purple theme, but I needed a fifth polish to round things out, and it stuck out the least in that role compared to the other textured glitters I pored through.
Though this isn’t a fantastic gradient – I think if I were doing it over again, I’d switch Too Dimensional to my ring finger – it’s still pretty, and when the light hits it, it seems to have a glow of its own.
A variety of textured purple glitters (flash). Starting from pinky: Avon Brushed Metals in Dusty Copper, L’Oreal Gold Dust in Sexy in Sequins, Julie G in Sugar Plum Fairy, L’Oreal Gold Dust in Too Dimensional?, and Avon Brushed Metals in Lilac Quartz
This is over a peel-off base coat (remove five fingers of hardcore glitter? Ain’t nobody got time for that!), so I don’t expect to get more than a few days’ wear out of it. After that? Hmmm. I have a beautiful Barbie pink from Sinful Colors that has a gold pearl to it, but it’s a bit too bright to do on its own. I’ll have to think about what I can add to it. I’m open to suggestions!
My husband’s and my wedding anniversary was a few weeks ago, but since I haven’t been feeling well lately, we didn’t get around to celebrating it until last weekend. We went out for hibachi, which is one of my favorite “special occasion” experiences, and even though the restaurant wasn’t super-fancy (no restaurant where they fling shrimp tails at you really can be), I decided to get gussied up anyway. Little black dress, pearls…and a smokey eye!
Now, smokey eyes is one of those things I spend a lot of time staring at on Pinterest and other people’s blogs, going “that can’t be so hard, the whole point is to not be exact!”, and then inevitably screw up royally when I try it on myself. So imagine my excitement when I actually more or less pulled it off this time using my LORAC Pocket Pro palette (picked up for $5 instead of $15 using Kohl’s cash a few weeks ago, oh yeah!).
The LORAC Pocket Pro palette
With only three colors (Nude, a very shimmery ivory, though you can’t see the shimmer in the picture; Pewter, a shimmery gray-brown; and Espresso, a matte dark brown), it sort of took away the “oh god which colors do I use?” panic that I usually have when trying to put together a combination. This was also my first experience with LORAC shadows, and I must say that I absolutely see what everyone’s been going on about. These shadows are incredibly buttery and pigmented. I swatched this palette on my arm right after swatching Coastal Scents Revealed 1 palette, and the difference was just night and day in pigmentation and texture (and it’s not like Revealed is all that bad, even!).
Wearing LORAC Pocket Pro paletteWearing LORAC Pocket Pro palette
Excuse the mismatched lighting and lack of centering in these pictures; hubby was trying to drag me out of the house while I kept yelping “but I want to get a better picture for the blog!” and I was forced to get my full-face shot in a moving car when he won the tug-of-war.
Looking at these pictures now, I see a bunch of stuff I did wrong, or could have done better, but overall I’m really proud of myself. This was the first time I managed a smokey eye that didn’t look like either “she calls THAT smokey?” or “oh dear, she tripped and fell into the vat of coal dust, didn’t she?”.
What could I have improved? Well…
Blending the darkest color back up into my crease a bit, so it looked less like a literal wing coming out the side of my head
Blending the medium color less inwards, so that there’s a clearer demarcation between light and dark on my inner lids
Acquiring a brow product that’s not absurdly too warm-toned for my eyebrows
Catching up on my waxing, which has sort of fallen by the wayside, because man, you don’t want to lay down on that table while not feeling well
Products used in this look:
Maybelline Dream Smooth Mousse foundation in Classic Ivory (I’ve been using Porcelain Ivory for a while now, but the more I looked at it in pictures the more I thought I might have gone a little too…light? cool? something. So I switched to Classic Ivory, which I think is working a bit better)
Maybelline Instant Age Rewind Dark Circle Eraser in Fair
Essence of Beauty Brow Color in what appeared to be a dark brown but was turns out to be a dark reddish-brown
LORAC Pocket Pro palette (Nude, inner lid and lower lashline; Pewter, crease, mid-lid, and lower lashline; Espresso, outer v)
Physicians Formula Shimmer Strips Kohl eyeliner for Brown Eyes in black (upper and lower lashlines, smudged out)
Urban Decay Perversion mascara
Milani Baked Blush in Luminoso
Stila bronzer in Golden, from the Portrait of a Perfect Cheek palette
NYX Butter Lipstick in Pops and NYX Matte Lipstick in Natural (I started with Natural, decided it was too pink, switched to Pops, and ended up with a sort of hybrid of the two)
So here’s something I recently realized: reviews and unboxings are all well and good, but there’s nothing unique about a blog post about those. Literally every makeup blogger does them, and if I just wanted to see how Product X looks swatched or used, I can choose from hundreds of blogs telling me just that. What I have more trouble finding is what those products look like when used by someone who’s, you know, sort of average at makeup, and maybe doesn’t own twenty MAC brushes, and is just sort of muddling along trying to make themselves look like all the awesome blog posts. I mean, if I spend $40 on the new hotness product, what is it actually going to look like when applied with my own, very uncoordinated little paws?
And then I realized, “but wait! I, myself, am someone who’s sort of average at makeup, and doesn’t own twenty MAC brushes, and is just sort of muddling along trying to make herself look like all the awesome blog posts!” And honestly, I spend a lot of time looking at pinterest, putting on makeup the way the pins say, and then looking at myself and going, “…oh. Hm. Clearly something went wrong here.”
The bottom line is that, much like how science values negative results in experiments, I feel like poor reviews and failed looks have value to those of us who aren’t already makeup artistes of great expertise. So I’m going to try my best to produce that kind of post every now and then, taking something from a blog or pin and seeing how it works in my real, wonky world. I’m not trying to debunk looks or anything; I don’t doubt that every one of the looks and techniques I’m going to try has been done, and beautifully, by any number of makeup lovers. But I’m probably not one of them, based on all available evidence and the fact that I’ve already spilled two meals on my shirt today.
And so today…
…I’m going to start by trying out a pin I’ve had on my makeup board for a while. This blog post provides a not-particularly-detailed tutorial (below) for how to use Urban Decay’s first Naked Palette to do an “everyday smokey eye” with three colors. Sounds pretty easy, right? “Everyday” usually means “pretty neutral”, and “pretty neutral” usually means “even if you screw this up it won’t be too noticeable.” Works for me!
I do not, however, own the Naked palette. Any of the Naked palettes, actually. At fifty-some dollars a pop, they’ve been on my “one day” wishlist for a while now. In the meantime, I’ve picked up some popular dupes of the Naked palettes: the Coastal Scents Revealed palettes. There are two of these palettes; Revealed 1 is said to have dupes for all the shades found in Naked 1 and Naked 2, while Revealed 2 has dupes for everything in Naked 3 (as well as a bunch of non-dupe shades).
I obviously can’t attest to how perfectly duplicative they are in real life, but based on internet pictures (which totally never lie!), they’re pretty damn close. So I feel relatively ok using Revealed 1 for a Naked 1 tutorial. Pinterest even hooked me up with a couple lists of which colors in Revealed are dupes of which colors in Naked 1. Unfortunately, the lists didn’t entirely agree, which means I labeled them on my Revealed palette once, then had to re-label some of them with the “some other person thinks this is actually…” color names. As a result, I can’t guarantee that the colors I use from Revealed are the dupes of the named ones for Naked 1, especially because as I put them on, they didn’t seem to match the pictures I was working off of. But their shades relative to each other at least looked pretty close, so, you know. The spirit of the thing is mostly intact.
Coastal Scents Revealed 1 palette, with corresponding(ish) Urban Decay Naked 1 color names marked
So here’s my version of a pictorial of me following the tutorial. I apologize for where the pictures are blurry; I’m experimenting with a new tripod and I swear these pictures looked perfectly clear when I eyeballed them immediately after taking them. Anyway, here’s me with just foundation and mascara on, to start.
Me, with only foundation (Maybelline Dream Smooth Mousse) and mascara (Urban Decay Perversion)
If you can’t tell, I have some discoloration on my lids, partly just because I have massive dark circles in general, and partly because I have a small patch of eczema on the eyelid we’re looking at here, and it’s irritated.
The tutorial’s instructo-picture said to start with putting Virgin…somewhere that looked vaguely like “all over the lid” (guys, seriously. Words don’t cost money. Use more!). So, I did.
Revealed palette Row 1, 2nd from left (aka Urban Decay Virgin…maybe)
Pale and shimmery. This looks nothing like the eye in the tutorial. I’m not sure if I suck, or I mislabeled my colors, or it’s just very different lighting and skin tones between me and the tutorial model (who, incidentally, looks like she starts the tutorial with a crease color already in place. I’m so confused).
Next, “Buck in crease and outer corner”. Ok, I can handle that.
Revealed palette Row 1, 7th from left (aka Urban Decay Buck, maybe)
If you can see anything through the blur (sorry, I totally blame the tripod) and the fact that I switched eyes (also sorry, I was one step ahead on the other eye before I remembered that I hadn’t taken a picture), you can see that…I sort of suck at putting stuff in my crease. I’m not entirely sure I even know what my in-makeup-parlance crease is, because when I put color in the actual physical area where my eyelid creases into my browbone, it doesn’t look anything like all the internet pictures of people putting color into their creases. So instead I end up picking a “sort of looks like the right location, ish?” area and pretending it’s my crease. This is some military precision, right here in the Porter household!
After staring at this picture and then the tutorial picture for a while, I’m wondering if maybe I have a very high browbone or something, because my browbone starts, like, where my eyebrow is, and hers seems to start halfway between her eyebrow and her eye. Hm. This is something to think about; I wonder would would happen if I put “crease” colors where my crease actually lies? I suspect clown-makeup eyes. Sadface.
Anyway, that was Buck (maybe), smooshed into my crease-ish area (maybe).
Next, “Darkhorse in outer corner and inner most crease inside Buck perimeter.” Ok well for one thing, I forgot to read the “inside Buck” part of that sentence before picking up my brush again. Then again, it’s not like I’m coordinated enough with my brushes to get things inside or outside the “perimeters” of other things. So it probably evens out in the end.
Revealed palette, Row 2 4th from left (aka Urban Decay Darkhorse, maybe)
Yep, that there’s some eyeshadow, on my eye. It’s brown. Woo.
Having slapped all the colors on approximately as the tutorial told me to, it was time to blend. This helped!
All colors, blended
Heyyy. Less blurry and it almost looks like an actual, you know, look. It looks nothing like the colors in the tutorial, but still, a look! Of some kind! Unfortunately the eczema splotch on my eyelid makes it look like I’m even less coordinated with the darker colors than I am.
Now at this point, I realized that though the tutorial had said nothing about what to do on my bottom eye area, the model was clearly wearing shadow there. So I winged it with a combination of Buck (maybe) and Darkhorse (maybe).
Shadow added to lower lash line
Despite my unconvinced expression, this seemed to balance pretty well with the rest of the look. So I moved on to the next step: “line eyes”. Not so hard, right?
NYX Studio Liquid Liner in Extreme Black
Erm, well. I sort of suck at liquid liner (and pencil liner. Gel liner I’m not so bad at!). And this liner is…shiny? Why the hell is it shiny, NYX? Who’s looking for shiny black liquid liner, for god’s sake? But I guess I’m stuck with what I have, since it’s already on my eyes. And it looks a bit better with my eyes closed, anyway:
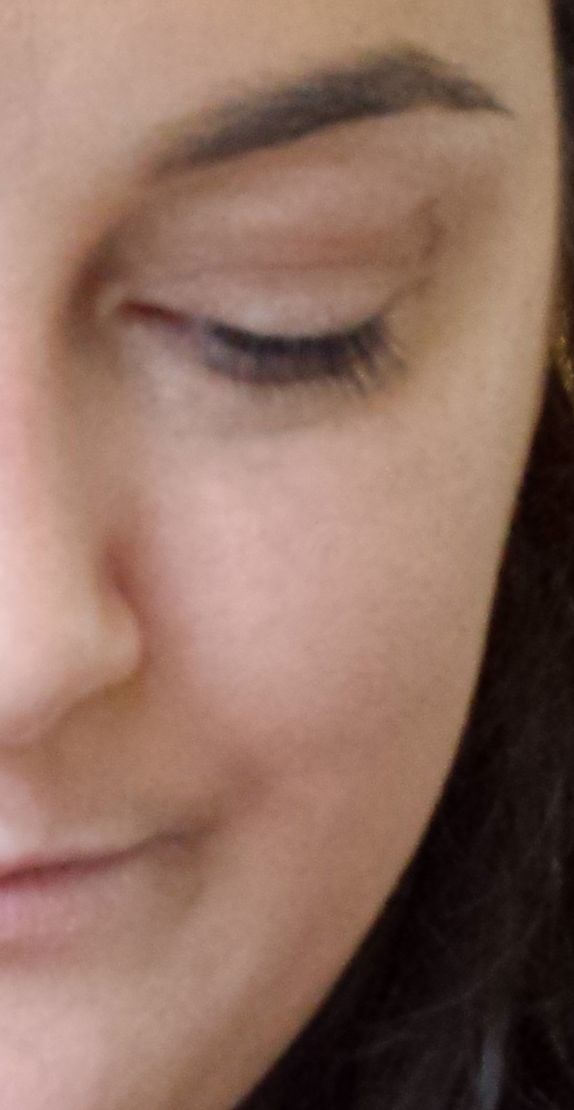
With liner, eyes closed
I think part of the problem with the eyes-open picture is that I might have mutant eyes? The amount of space between my eyelashes and the fold in my eyelid when my eyes are open seems to be much smaller than the space on people who I see pictures of on makeup blogs. As a result, what’s quite clearly a thin line with my eyes closed ends up taking up nearly all the lid space I have with my eyes open, making it look way thicker than it is.
Or maybe I’m overthinking this and it looks just fine. That’s also a possibility!
Anyway, having made my makeup bed, it was time to lie in it and add the finishing touches to the rest of my face: Milani Baked Powder Blush in Corallina, and Revlon Colorstay Moisture Stain lipstick in India Intrigue.
Finished look, eyes closedFinished look
So, there you have it: expected result vs actual result.
On the bright side, I don’t look bad, per se. On the not-so-bright side, I look pretty much nothing like what I thought I was imitating. Also I look like a toddler did my eyeliner.
So what have I learned from trying to imitate this look – about makeup, my anatomy, or anything else?
I’m probably a mutant in one or more ways
Damn, I’m pale
Tutorials are much more useful when they use complete sentences. I should probably consider working off a video tutorial next time; I suspect it will be useful to see someone actually performing the actions I’m supposed to be performing
I need to figure out a way to make eyeliner work with the small amount of lid area I seem to have available. Perhaps the whole “chunky wing” thing just isn’t suited to me, or perhaps I’m just doing the “chunky” part overzealously. Needs investigation.
I shouldn’t be afraid to blend color not just up, but out. When I open my eye, especially if I have eyeliner on, anything on my lid is pretty much not in play; color has to come from outside that area.
Makeup that seems way overdone when I’m squinting at myself in the mirror turns out to be way underdone when I take a photo and plunk it next to what I’m “supposed” to look like
What seems like extreme curl and length from my mascara is nothing compared to whatever ninja mascara-falsies “look” models wear. Pile it on, Amy!
I don’t know how to do lower lid shadow. Like, at all. Every instinct I have screams that smearing dark colors onto an area where I already have dark bags is a bad idea…and yet it seems to work for everyone else!
On that note, I should consider investing in some hardcore undereye concealer, maybe from somewhere like MAC. If I’m not competing with the dark circles, maybe I’ll be more comfortable using dark colors there.
My strategy for lipstick picking currently consists of “open drawer, go ‘ooh that one’s pretty’, apply lipstick”. There are probably some coordination considerations here that I should be aware of, but I have no idea how to figure out what they are
So, my fellow klutzes, that’s what happens when someone who’s just about figured out which end of the brush to hold tries to imitate a blogged look: too much eyeliner, not enough eyeshadow.
What looks have you been trying to imitate lately? Anything you’ve learned, especially if it seems utterly obvious in retrospect but still never occurred to you? Any insight you can offer about the things I need to work on?
It’s been a while since I did one of these, so I think it’s time again for a manicure round-up, where I show you pictures of manicures I’ve worn recently and do a short paragraph on each rather than a full post. In this case, these manicures go back quite a while, some a month or more (this summer has been one crisis after another; I’m lucky I got paint on my fingers at all!), and not all the pictures are that great. But nonetheless, there are pictures and that’s gotta count for something, right?
Let’s start with the one I called my mint chocolate chip manicure:
This contained, at its heart, only two polishes, but since one was gloss and one was matte, it also involved a sandwich of topcoats. I started with L’Oreal “Mint Glacee”, a pale mint green gloss. Then I freehanded – really, really messily – half of each nail over it with Sally Hansen Insta-Dri in “Mauve Matter”, a brownish-mauve matte. I slicked the whole thing over with Seche Vite to get it a bit drier, then added Nicole by OPI’s Matte topcoat over everything. As you can see if you look closely at my middle finger, the layers of topcoats got a little wonky in spots, but this nevertheless turned out pretty nice, at least from a few feet away. Everyone who commented on it told me it reminded them of mint and chocolate. Inspiring cravings everywhere I go: my work here is done!
Next a manicure I did solely to troll my husband, because I’m just a terrible person like that. You see, I’m an artsy girl. I don’t really get sports in general, and I really don’t get the religious fervor with which some people approach certain sports. My husband, on the other hand, will comfortably tell you that football was a second religion in his house growing up, and he continues to be obsessed with it. There’s a longstanding rivalry in his home state between two schools; one’s colors are red and black, and the other’s color is orange. He worships the red-and-black school, and apparently doing so requires loathing the orange school. So far, so understandable. I don’t feel it, but I can understand fandom.
But here’s where it got weird for me: because he dislikes a school that likes orange, he has a genuine, deep-seated emotional hatred for the color orange, everywhere. He automatically dislikes orange clothes or makeup I put on, even if they look objectively great, solely because they’re orange, and orange is the color of that team.
So when he told me how excited he was for the beginning of college football season and the first game his red-and-black team would be playing, what else could I do but…this.
Revlon Gel Envy “Long Shot”, Avon Cosmic “Saturn”
That’s Revlon Gel Envy in “Long Shot” on everything but my ring finger; Avon Cosmic nail enamel in “Saturn” on my ring finger, and a matte topcoat on everything. I didn’t particularly love the all-orange look, but it did its job: hubby squealed in indignation when he saw it. Mischief managed!
Next up was another Sally Hansen Miracle Gel, this time in blue:
Sally Hansen Miracle Gel – Hydro-Electric
If you look closely here, especially at my pinky, you can see one of the weaknesses of the Miracle Gel line: opacity. This is two coats of Hydro-Electric, and you can still see visible nail line (noooo, the dreaded VNL!). The same thing has been the case with all the Miracle Gels I’ve tried: two coats isn’t going to cut it, and depending on the color, three might not either. Now, each coat dries quickly, so it’s not like it’s a huge hardship to have to slap a third on top, but I still keep being surprised by how even colors that look deep, dark, and opaque in the bottle thin out on my nail. I expect “gel” colors to be thick and opaque; Miracle Gel is neither.
After a couple of mostly-creme manis, I decided to go wild with a glitter. I laid down my trusty Nail Pattern Boldness Glitter A-peel, then went to town with Sally Hansen Complete Salon Manicure in “Mermaid’s Tale”.
Sally Hansen Complete Salon Manicure – “Mermaid’s Tale”
This is a deep blue-black jelly with blue and teal glitter. This is also a really terrible photo of this manicure. I apologize to those of you with a sense of aesthetics. For those of you who don’t care about my photography skills: I got about four days out of this before an entire index finger’s worth of polish popped clean off, signalling it was time to move on. Ah, peel-off base coat. You giveth and you taketh away.
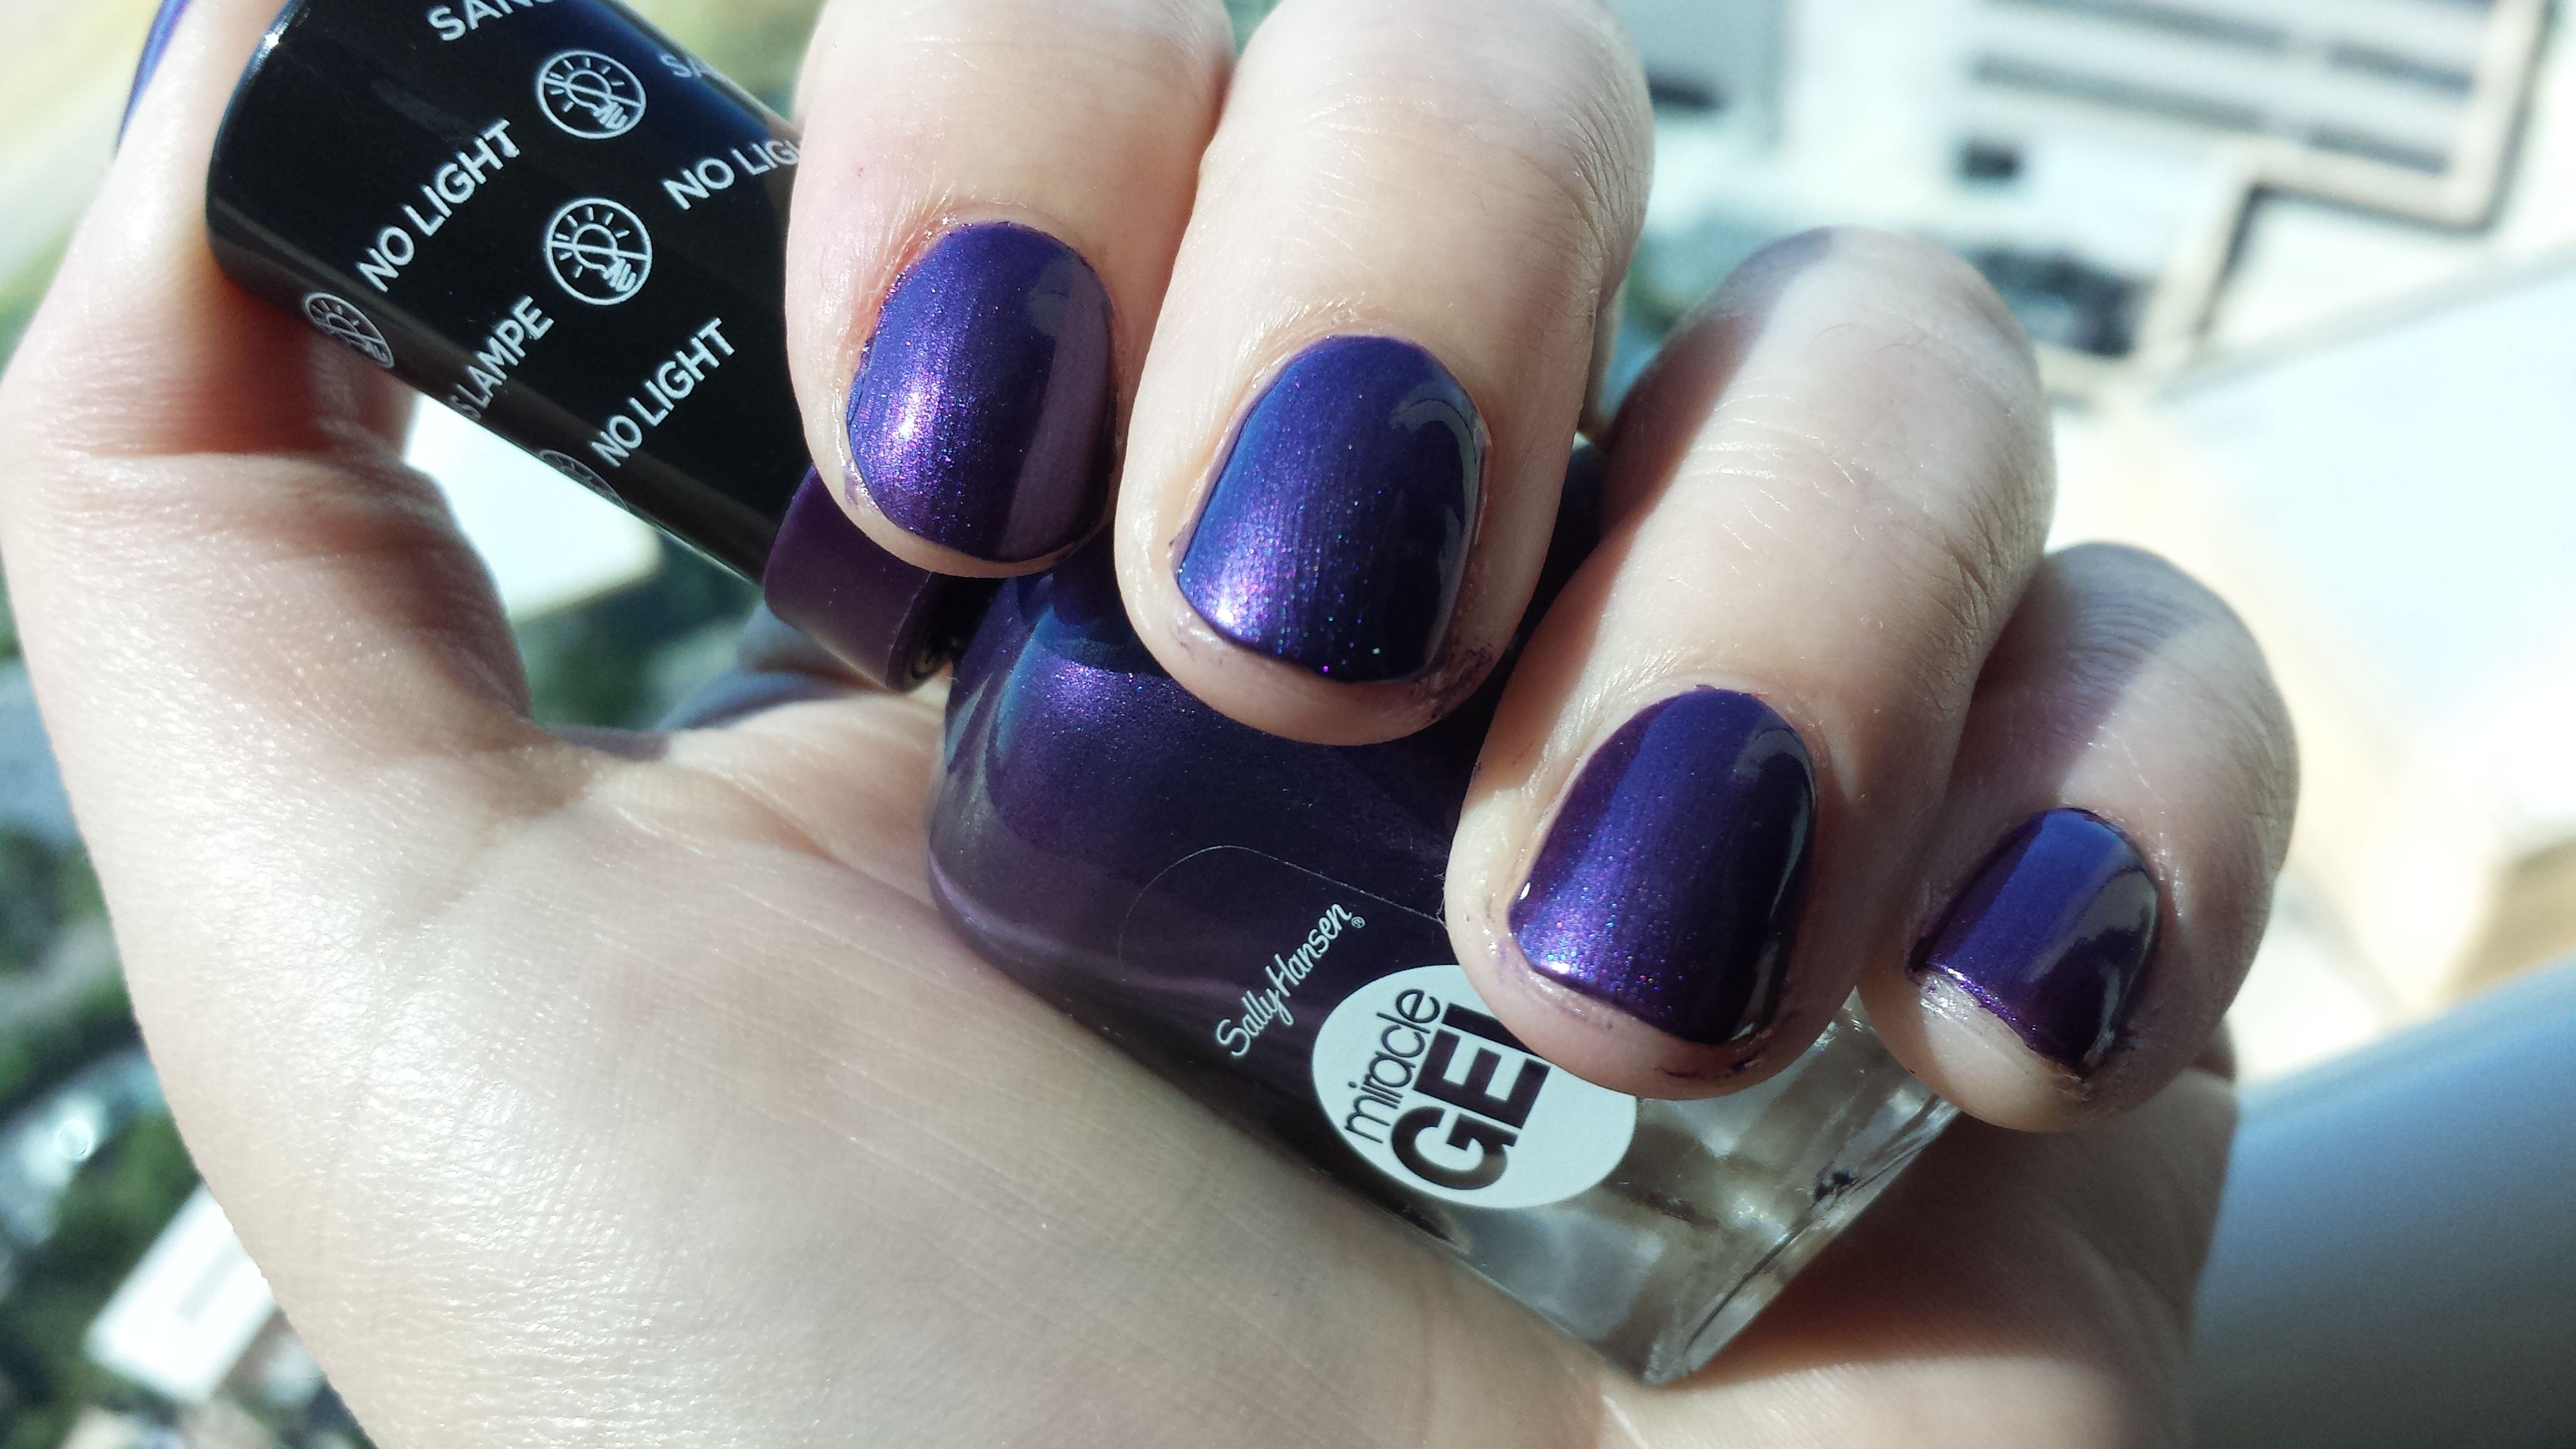
Time for something that was neither creme nor glitter. Yay metallics!
Sally Hansen Miracle Gel – Purplexed
Can you tell yet that I really like the Miracle Gels? Because yeah, this is another one. Folks, meet “Purplexed”, a metallic eggplant with just the tiniest smidge of blue duochrome effect. It was awesome. It lasted a week. It basically functioned like every other polish I’ve tried from the Miracle Gel line. Moving on…
Zoya – Dream
Oh, my moons and stars! This is Zoya’s “Dream”, which I picked up during Zoya’s July three-for-free sale. I bought it hoping for a galaxy on my fingers and it did not disappoint. Zoya is a brand I don’t own too much of, so I’m still feeling it out for longevity and such. I put “Dream” on on September 5th, and though tip wear happened as usual, I didn’t see my first chip until the 11th. Six days: not too shabby for a non-gel polish.
And finally, the simplest manicure that’s ever made me feel disproportionately proud of my nail art abilities:
After seeing a similar manicure on Pinterest, I figured a) this would be pretty hard to screw up, and b) I totally had the colors to make it perfect! I did actually manage to screw it up a little – centering all those dots can be hard, and it’s easy to get drag marks on your dots if you’re not careful with your topcoat – but I still think it came out awesome. I am ze nail art wizard, yezzz.
What colors and patterns have you been wearing lately, my dears?
The products in this post were received for free in exchange for a review. The opinions in this post are my own, but the text of this post has been approved by the brand.
Ok kiddies, prepare to squeal. Courtesy of Brandbacker, I got my hands on one of the new One Direction makeup kits I posted about a while ago. They sent me the Take Me Home collection, which features golds, browns, and pinks, which is just about perfect for me (I had my fingers crossed that I wouldn’t get the blue-based “Up All Night” collection – I’ve lived through the 80s, I don’t need more blue eyeshadow!). So without further ado, let’s get to the unboxing!
Makeup by One Direction “Take Me Home” collection box, front view
It’s a box! Whee! Well, more specifically, it’s a hinged metal box printed with brickwork, with a plastic sleeve printed with the boys and their signatures slipped around it. Gives it sort of a nice 3D effect, and when you take the sleeve off, you’re left with an unbranded (outside) reusable box, which is one of those things that’s handy to have around.
Makeup by One Direction “Take Me Home” collection enclosure card, side 1
Also enclosed with my package was this cardboard card, which on one side tells me about the collections, and on the other side I’m special because I got a pre-launch preview (woo!).
Makeup by One Direction “Take Me Home” collection enclosure card, side 2
Opening up the box, we find the makeup, securely stored in a plastic tray, on one side, and a card with instructions for some looks on the other.
Makeup by One Direction “Take Me Home” collection box interior
A better shot of the makeup tray:
Makeup by One Direction “Take Me Home” collection makeup tray
Going clockwise-ish from the top left here, we have:
“I Wish”, a chocolate-brown eyeshadow/body pencil
A 5-pan eyeshadow palette
“Last First Kiss”, a bubblegum-pink lipstick
“Kiss You”, a sparkly orange lip gloss that glows under UV light
“Little Black Dress”, a basic black mascara
“Live While We’re Young”, a gold glitter nail polish topper
A set of body stencils which you’re intended to use with “I Wish” to decorate yourself
Swatches:
Makeup by One Direction “Take Me Home” collection swatches. Top row: I wish, Back For You, Change My Mind, C’mon C’mon, Little Things, Take Me Home. Bottom row: Last First Kiss, Kiss You
I gave everything a try, and here’s what that looks like (yes, I cheated and used beauty mode. I’ve been sick this week and you guys really don’t want to see me unretouched…)
Wearing the Makeup by One Direction “Take Me Home” collectionWearing the Makeup by One Direction “Take Me Home” collection
Conveniently forgetting that the box gave me a guide for how to use the eyeshadows, I sort of rolled my own look here. I used “Back For You” (peachy cream) on my browbone, “Change My Mind” (sparkly pink-peach) on my lids, “C’mon C’mon” (gray-ish taupe) blended into my crease and under my eye, and “Little Things” (warm brown) to line my upper lids. Then I decided to get fancy and added “Take Me Home” (gold glitter cream shadow) to my upper and lower lashlines, and a touch of “I Wish” (brown cream shadow stick) to my crease.
Here’s those eyeshadows in-pan before use:
Makeup by One Direction “Take Me Home” collection eyeshadow palette
And after use:
Makeup by One Direction “Take Me Home” collection eyeshadow palette
Yes, as other reviews have noted, the glitter in “Change My Mind” and “Take Me Home” is largely an overspray that’s removed once you actually use the colors. But I didn’t have any trouble getting both to still register on my eye as shimmers; you’re just losing the serious chunks of glitter. The bigger problem I have with the overspray is that it makes “Change My Mind” look lighter than it is.
All of the shadows were a smidge on the soft side, and the color payoff on the mattes was mediocre, but hey, these are neutrals anyway. I found them to be quite pleasant to use and they blended well to make a beautiful, understated look. The only real complaint I have is that “Take Me Home” tends to migrate; within a half hour of application, my gold lower lashline looked like it was slowly melting down my face.
Makeup by One Direction “Take Me Home” collection lipstick and lip gloss
We had a slight accident with my delivery, such that the package containing my kit ended up sitting on my doorstep for a few hot days while I was away, and “Last First Kiss”, the lipstick, suffered for that, melting a bit into the lid. But after I squished it back into the tube, it’s been perfectly fine to use, and I find the color surprisingly flattering on me. Bubblegum pinks are hit or miss with my complexion, but this is a hit. It’s not the most long-lived lipstick – plan to reapply every couple of hours – but it’s moisturizing and comfortable to wear, and generally quite nice.
The lip gloss here is interesting. In the tube and on my arm, it’s sparkly orange. On my lips, it spreads out to just a clear sparkly gloss, which is probably for the best because I’m not sure how I’d feel about my lips being this shade of orange. Unfortunately, I don’t have a UV light to test the glow of this with; I’m forced to use my imagination, which says this would look awesome.
Makeup by One Direction “Take Me Home” collection shadow pencil and stencils
The kit bills “I Wish”, the shadow pencil, as an eye or body pencil. I tried it in both places. You can see it in my full-face shot above; it’s the unblended brown in my crease. It applied ok, but, well…didn’t blend very well at my soft touch. As far as using it for stenciling, the less said about my attempts, the better. Suffice it to say that a stencil using a very soft, chocolate brown shadow crayon and unsteady hands is mostly going to come out looking like a very soft, chocolate brown splotch that probably should be washed off, not photographed.
Makeup by One Direction “Take Me Home” collection nail polish and mascara wand
The collection is capped off by a mascara – a very basic, does-nothing-in-particular black that added no particular curl, length, or volume to my lashes – and a glitter topper nail polish. The topper has medium gold hex glitter, as well as rose gold and teal small circle glitter. It’s a nice enough polish, but I don’t lack for gold-ish glitter toppers, so I sort of wish they’d gone for a more opaque polish of some kind – gold foil or holo, perhaps? Chocolate brown with gold shimmer would have been awesome.
Makeup by One Direction “Take Me Home” collection nail polish swatch – two coats
Overall, I’m pleased with this collection. It definitely has its weak points – the mascara is just a nonentity, and the shadow crayon and I really need to have a serious talk – but I’m definitely going to get solid use out of the eyeshadow palette and the lipstick, and I see a UV light in my future purchase plans just so I can play with the lip gloss.
Sally Hansen’s new Miracle Gel line of nail polishes is a gel hybrid that doesn’t require a special UV light. Instead, it cures using a little bit of chemistry between color and top coat, and a little bit of natural sunlight as you go about your day. It bills itself as lasting “up to 14 days”. Awesome, right? No fancy lamp, but just as much wear time? Well, I was skeptical. Even real salon baked-in-the-UV-oven gels don’t last that long on me; they start peeling from the bottom after about a week. But Sally produced some really cool colors in this line, and I found myself picking some of them up hopefully. The worst that could happen, I figured, would be it lasts as long as a not-particularly-special normal polish (on me, usually 4 days) and I get some cool colors into the bargain.
My first attempt with Hunger Flames, a metallic fuchsia, ended in sadness as I managed to scuff, gash, and ding half my nails into oblivion within the first hour (though each coat goes on thin and dries quickly, and the top coat will dry multiple coats to the touch in a few minutes, the finished manicure remained soft and harm-able on me for about 30-40 minutes. whoops.). I’m lazy, though, so I wore that for about five days, because who looks that closely at my hands?
Still, I wanted to give this stuff a serious road test to find out what it could do. So after I cleaned Hunger Flames off my nails, I decided to try again, with an accent nail and perhaps a bit less klutziness. So I grabbed Dig Fig, which is a red sort of in between strawberry and burgundy, my dotting tool, and two other polishes, and went to town. Freshly painted, I ended up with this:
Sally Hansen Miracle Gel in Dig Fig (red), Avon Gel Finish in Mudslide (brown), Piggy Polish in Yellow There (yellow). In my head this looked more like mod dots and less like googly eyes.
Each nail got three layers of Dig Fig, then a layer of the Miracle Gel top coat. Then I wandered outside and stood around for about five minutes to let the sun get at my hands. This isn’t strictly necessary – it’s not in the instructions or anything – but it seemed like a good idea. Sunlight = UV = more curing! When I came back inside after that, I added the dots on top of an accent nail on each hand, and then topped those nails only with NYC Grand Central Station top coat. I gave myself about an hour off doing anything heavy with my nails, to make sure everything was good and set, and then carried on with my life.
How did it last? Well, Day 5 was the first day I noticed tip wear; here’s my left hand that day:
Sally Hansen Miracle Gel manicure, Day 5
On day 7, I noticed some tiny chips on my thumb and index finger on my right hand, but forgot to take a picture. Here’s how my right hand (I’m right-handed) looks today, on Day 9:
Sally Hansen Miracle Gel – Day 9
It looks pretty noticeable from that angle, especially on my index finger, but here’s the same hand a few minutes later, at a more realistic angle:
Sally Hansen Miracle Gel – Day 9
Tip wear? Sure. Edge of my thumb looking a bit worse for the wear? Yep. But the polish is still almost as glossy as it was on day 1, and I could definitely get at least a day or two more out of this before it got so bad that anyone but me noticed the wear. And I have had zero of the peeling-from-the-bottom problems I have with “real” gel that lasts less time.
I’m going to take this off today, because I want fresh nails for tomorrow, but I’m calling it: Sally’s 14-day wear time is more or less confirmed. Obviously everyone’s nails are different, but for me, where a typical manicure lasts 4 days and a salon gel lasts 6, 9+ days of wear from Sally is about as good as it gets.
Despite evidence to the contrary, I am still alive! I apologize for the long period of silence; my mother-in-law was visiting, which meant giving up my guest room (aka my makeup room) to her and trying to avoid getting any more comments about how much makeup I own, so blogging sort of fell by the wayside. I’ve got a lot of ideas for posts floating around my head now, though, so hopefully you guys will profit from my having to hold back for a few weeks.
Today, I’m bringing you my August 2014 Ipsy Bag. The theme this month was “Beauty Schooled”, and Urban Decay contributed two of their new(er) products to the products Ipsy chose from, to much internet excitement. Let’s see what I got…
August 2014 Ipsy Bag – GlamGlow YouthMud, Manna Kadar Sheer Glo Shimmer Lotion, Jersey Shore Sun Mongongo Lip Conditioner, Lord & Berry Black Silk Kohl eyeliner, and Urban Decay Perversion mascara
In an orange-and-white polka dot tube-shaped bag that is cute but made of cheap unlined vinyl, I found, first and squee-most, Urban Decay Perversion Mascara. (0.1 fl. oz. sample; full 0.4 fl. oz tube costs $22, so this is worth about $5.50) Much like their popular Perversion eyeliner pencil, Urban Decay bills this as “Bigger. Blacker. Badder.” It’s supposed to be a blacker-than-black, make-your-lashes-look-insane product, and…I was expecting to be underwhelmed. All the blog reviews I’d read of the product were glowing, but pictures of the mascara in use on those blog posts just didn’t look very special. I’ve mentioned before that my taste in mascara runs to the boring; I don’t like my lashes to be stuck together or theatrical-looking, and I suspected that that was what Perversion was going to give me, since it seems to be what “volumizing” mascaras all seem to do.
Folks, I’m here to tell you I was wrong. Hot bleepin’ DAMN, you guys, this stuff is awesome. For comparison, I give you, uh, my eyes.
Open, eyelashes uncurled in both photos:
My bare eyelashes, eyes openMy eyelashes with Urban Decay Perversion mascara, open (3 coats on top lashes, 1 coat on bottom lashes)
Closed:
My bare eyelashes, closedMy eyelashes with Urban Decay Perversion mascara, closed (3 coats on top lashes)
I can’t even with this. There’s no clumps. My lashes look insanely long. And yes, blacker than black. I hate mascara because none of it ever looks good on me, and now Ipsy has twice sent me mascaras that are inexplicably awesome. I’m seriously going to go have to spend actual money on Perversion now when my sample runs out, and I’ve never done that before with an Ipsy product.
*deep breath*
Calming down now. I’m ok. Aaaaanyway. Also in my bag were:
GlamGlow YouthMud Tinglexfoliate Treatment (0.5 fl. oz sample; 1.7 fl. oz. full-size sells for $69, so my sample is worth about $20). Ipsy keeps sending me these exfoliating treatments, and I keep nodding politely and stuffing them in a drawer without using them. The skin on my face is just too sensitive for me to want to risk scraping it raw with sandy stuff. I will say, however, that I opened this Tinglexfoliate Treatment and sniffed it and it smelled exactly like the bag of Sour Patch Kids I’ve been snacking out of this week. Ain’t nothin’ wrong with that! Use code IPSY30 when checking out at glamglowmud.com for 30% off any purchase.
Jersey Shore Sun Mongongo Nutrient Dense Anti-Aging Lip Conditioner (.15 oz full-size, worth $5.50). For all that this has a very long name, this is basically Chapstick. I mean, it’s fancy Chapstick – it’s certified organic, and it’s supposedly Mandarin Orange-scented (though my stick smells more like Key Lime Pie, and I’m cool with that) – but it’s basically a hydrating stick of wax you put on your lips. It does the job. It’s not unpleasant. But it doesn’t really do anything Chapstick doesn’t do just as well at half the price. Use code IPSY50 when checking out at JerseyShoreSun.com for 50% off all of their Lip Conditioners.
Manna Kadar Sheer Glo Shimmer Lotion (0.27 oz. sample; their site doesn’t list a weight for the full-size, which retails for $29, so I’m going to eyeball it and guess this is worth about 1/3 of that, so $10). This is a pale pink, shimmery highlighter lotion that they say “enhances eyes, lips, or lashes.” It was a pretty highlight when swatched on my hand, but when I blended it into my cheekbones it just flat-out disappeared. I’m not too experienced with liquid highlighters, so maybe I was just doing it wrong, but man…disappointment. I’m going to keep playing around with this in the hopes that I figure out its secret, though. Use code IPSY20 when checking out at mannakadarcosmetics.com for 20% off any purchase and a free gift.
Lord and Berry SILK Kajal Kohl Eyeliner in black (0.02 oz. sample; full size official price is ¯\_(シ)_/¯ since their online store is “temporarily closed for refitting”. Googling, it looks like this sells for around $19 for perhaps 3x the size of the sample, so let’s guesstimate $6 for my sample). It’s a kohl eyeliner. It’s black. It’s perfectly fine, but no different than the five other black kohl eyeliners I already own. Use code LAB@14091 when checking out at lordandberry.com for 25% off any purchase.
Total value of bag: (very) approximately $48, with nearly half that made up of the GlamGlow exfoliating treatment.
How does it all look put together? Pretty ok, but that’s mostly thanks to the mascara. In this photo I’m wearing:
Maybelline Dream Wonder Fluid-Touch Foundation in 10 Porcelain ivory
Coastal Scents Revealed 2 Palette (third pan from the left, top row)
Urban Decay Perversion Mascara
Lord and Berry SILK Kajal eye pencil
Manna Kadar Sheer Glo Shimmer Lotion
NYX Matte Lipstick in Alabama (which is actually more brick-red than the tomato-red it appears in this photo)
Ipsy August 2014 products in use
If you would like to try Ipsy, please consider signing up via my affiliate link; if you do, I get some “Ipsy points” to use on future products.
Hi guys! Today I’m bringing you a giveaway opportunity courtesy of BrandBacker and Markwins Beauty. I’m not being compensated for this post; I just get the fun of letting my readers in on a chance to win something, and maybe bringing in some new readers for myself.
So, is everyone familiar with One Direction? They’re the latest boy-band-the-girls-love-to-love, they’re huge all over the globe, and now they’re releasing their own line of makeup kits! These kits are being created by the same company that produces Physicians’ Formula and Wet ‘n Wild cosmetics, so this isn’t just some fly-by-night themed knockoff, either – these are real, quality makeup. Let’s talk a little about what you’ll get…
The One Direction Looks Collection – Midnight Madness kit
There are three kits, each named after one of 1D’s three albums and each containing different shades, so you can pick what colors – or what album! – suits you best. Each kit contains one each of:
Liquilights Glow Gloss, which is a sparkly pop of colored gloss that glows under UV light
One Direction Creme Lipstick in a coordinating color
A travel compact containing four pressed powder eyeshadows and one glitter creme eyeshadow
A chubby pencil that can be used as eyeshadow, eyeliner, or all-over body color
Little Black Dress mascara, a black volumizing formula
A nail polish
Some 1D stencils that will let you add temporary graphic art to yourself or your friends
The “Midnight Madness” collection (that’s it in the picture up there ^^) is red-themed, and contains a poppy-colored Liquilights Gloss, red creme lipstick, eyeshadows in shades of gray and pink, a blackest-black chubby pencil, and a metallic steel nail polish (as well as the aforementioned black mascara and body stencils).
The “Take Me Home” kit (below) is shades of yellow, with an orange glitter Liquilights Gloss, a nude-pink lipstick, eyeshadows in peaches and taupes, a warm chocolate-brown chubby pencil, and a gold glitter nail polish (as well as the aforementioned black mascara and body stencils).
One Direction Looks Collection – Take Me Home kit
The “Up All Night” kit (below) is all blues and pinks. In it you’ll find a pink glitter Liquilights gloss that glows orange in the dark, eyeshadows in pinks and blues, a pink creme lipstick, a denim-colored chubby pencil, and an acqua-blue metallic shimmer nail polish (as well as the aforementioned black mascara and body stencils).
One Direction Looks Collection – Up All Night kit
Excited yet? I’m not even a boy-band fan usually, but these kits sound pretty awesome to me – glow-in-the-dark lip gloss? Yes please, one of each shade!
These kits are debuting in the U.S. at select stores in August (Macy’s: August 11; Stage Stores, Dillard’s, Beauty Brands, Lord & Taylor: August 25). They will also be released internationally, but there’s no exact date for non-U.S. releases yet.
However! Because you, dear reader, are awesome and read my blog, you can enter now for a chance to win not only a One Direction Makeup kit, but also tickets to a One Direction concert!! The tickets are for a show in Foxborough, MA on Friday, August 8th, 2014, at 7:00pm and do not include transport or hotel costs. U.S. and Canada entrants only, please.
The drawing will be on July 29, so hurry up and get your entries in!
Enter right here with this widget:
;
If you can’t get the widget to work – it and WordPress seem to be having some disagreements – you can also enter here.